Spooky Black Nail Paint Art for Halloween
It’s Halloween and all of us are excited about getting ready in the spookiest way. Talking about Halloween makeup we are all set for that day. But why should we keep on this for only one day? let’s make it last long for few more day. Let’s give our nail a spooky touch that gonna last long. With black nail paint art, you can rock the Halloween party. Polish your nails with black nail paint and complete with blood, webs and some spooky things. So let’s see how to make your black nail paint art spookiest. So keep reading…
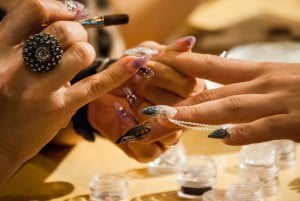
Black Nail Polish – Spooky Black Nail Art For Halloween is a fun and easy project. It is great for crafting and doesn’t take much time or effort to complete. Nail polish with spooky nail art designs are a unique addition to your Halloween parties or decorations. This style of painting nails can be done by just about anyone. You don’t need to be a professional artist to complete this project, but if you are it is a great way to add to your Halloween parties!
You can make your own Halloween Nail Polish by using black nail polish, hot glue, glitter, and water. For the glitter, I use regular toothpick dipped in gel or gloss, and place a few drops on a piece of paper towel and slowly dab it onto my nail. It takes a few minutes to get it dry, so don’t rush your work. After you have your nails all ready, start to apply the black nail polish. Just dab it on until it looks good and smooth, do not apply it too thickly, or it will leave dark streaks.
When you are done, use a small dab of hot glue to stick the black nail polish to your finger. You want to have an even amount of glitters on your fingers, but it is not important if they are not even or very light on your nails. Then just apply more glitter with the hot glue and enjoy your spooky black nail polish. This is a great Halloween nail decoration that are easy to do, and fun to make. I think everyone could have a blast creating their own Halloween nail polish with spooky nail art designs.
Black Nail Paint Art for Halloween:
Getting ready for Halloween is quite tricky as we have to think more about how to look unique and scary. So let’s try something different by painting and design our nail with black nail paint art. So there are some ideas you can totally use to get the spooky black nail paint art. These are…

Mystical Flame Nails:
The film, Maleficent did not entirely energize these Mystical Flame Halloween nails and to some degree the amazing destructive green LimeCrime clean. This smooth arrangement looks so direct anyway getting those fire plots totally faultless requires some obsession. In the present instructional exercise, we show to re-make this look yourself and, should you wish to take it to the accompanying level, design the dull fire with splendid orange or yellow.
How To:
- Apply 2-3 coats of opaque acid green nail polish on each nail.
- Before you start painting the flame pattern on your nails, draw the pattern on paper. It will be much easier to re-create the look on nails.
- Work one nail at a time. Use a thin liner nail art brush to paint the flame outlines.
- Fill in the outlines using thick nail art brush or nail polish brush.
- If some flame lines didn’t turn out well, use the green polish and detailing brush to correct your mistakes and smooth all uneven lines.
- Repeat step 3-5 on all nails. Allow 15 minutes for your design to dry, then apply 2 coats of a clear top coat to seal and smooth the design.
‘Great Gatsby’ Nails:
Great Gatsby fever has affected me in its own unique malicious way. As soon as I saw the trailer an idea for Gatsby’s nails was born! I used striping tape to create a sharp art deco pattern and metal studs to add an extra dimension. As for the colors, naturally, I opted for rich black and gold to match the decadence of the era.
Gatsby’s nails are quite easy to do, just follow the nail art tutorial below. It does require some time and patience so if you’re short on time, just create the pattern on one accent nail and paint your other nails in solid black.
How To:
- Apply a protective base coat.
- Apply 1-2 coats of gold shimmer polish on all nails.
- Let it touch dry.
- Create the art deco pattern as pictured with striping tape. Make sure the tape is attached properly to the nail so the polish can’t bleed.
- Paint 2 coats of black polish over the pattern.
- Carefully remove the tape to reveal the pattern*.
- Using a toothpick dipped in top coat to attach the stud to the nail. Move onto the next nail & repeat steps above.
- When all nails are done cleanly around cuticles with an angled brush dipped in polish remover.
- Wait a few more minutes and apply 2-3 topcoat layers on each nail to even out the surface.
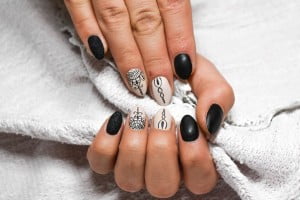
Delicate Cobweb Nails
Thin, white spiderwebs dancing all over your nails is the perfect pairing for a witch, warlock, or wizard costume.
How To:
- Polish nail in a charcoal or slate grey.
- With a small detail brush or a nail art pen, paint 5 thin black lines fanning out from the cuticle area.
- Now paint small half circles connecting the lines together to create a web.
Skeleton Nails
Who would’ve guessed that skulls could be so cute? And if you’ve got a thin paintbrush, they’re surprisingly easy to accomplish. Sure, it’s a bit of faff. But in terms of effort versus end results, it’s totally worth it. People will be seriously impressed with your Halloween dedication, but you don’t have to buy a costume or look like an idiot on the tube.
- Apply two coats of white nail varnish.
- Use a brush to paint around the outside of the nails with acetone (vaseline works too) to prevent polish from getting all over your fingers.
- With a thin brush, apply black vertical stripes on all of your nails apart from one on each hand.
- On the final finger on each hand, use your thin brush to paint on ovals for eyes, a smile, and two lines for a nose.
- Apply a clear top coat on all your nails and wait to dry.
Black Widow Chic Nails
Who says Halloween nails can’t be sexy and stylish? Play with texture, color, and angles for a manicure that’s perfect for parties. Random, webby patterns accent the recognizable black widow “hourglass” shape on the other nails in this manicure.
How To:
- Using your nail art striping tape, randomly block off parts of your nails. I like to use 4-5 pieces of tape per nail.
- Push down on the tape to ensure a tight seal with the red base.
- Paint directly over the entire nail using your black textured polish.
- Slowly and carefully remove the striping tape, one piece at a time.
- Clean up any stray bits of polish using a makeup brush dipped in polish remover.
- Using six pieces of nail art striping tape, create an hourglass shape in the center of your accent nail.
- Paint outside the tape lines using a nail art brush. You may be able to use the brush that comes with the polish if you work very carefully, but I do prefer the precision of the nail art brush.
- Slowly and carefully remove the striping tape.
- Fill in the areas around the outside of the hourglass that the tape was blocking to create a complete enclosure.
- Clean up any stray bits of polish using a makeup brush dipped in polish remover.
So these are the black nail paint art for Halloween look. So try them out and be spooky.
Happy Halloween…!